Roku Subtitles Out of Sync Not Working [Quick Methods 2024]
Are you experiencing Roku subtitles out of sync? Don’t let subtitle troubles ruin your streaming fun. Discover quick fixes and solutions to sync up your captions effortlessly. This guide helps you troubleshoot subtitle sync issues on Roku for seamless and enjoyable binge-watching.
Reasons Behind Roku Audio Out of Sync
This issue arises when a media’s audio and video components are not synced, causing a delay between the screen and speaker.
This means the audio may need to catch up or be ahead of the visual. It makes the immersive experience of movies, TV, and other media unpleasant. It is possible when viewing Netflix, Amazon Prime Video, or Hulu.
The issue can affect different Roku devices and models, impacting both inbuilt smart TVs and external streaming devices.
These factors can disrupt the synchronization between audio and video components, resulting in an audible latency between what is heard and what is seen.
Understanding these factors may help users in troubleshooting and effectively addressing the issue.
- Cable Connections: Faulty or loose cable connections, particularly HDMI cables that transmit audio and video signals, can result in synchronization problems. Inaccurate connections can disrupt the data flow, causing audio playback delays.
- Audio Settings: Incorrect audio settings on both the Roku device and the TV can lead to sync issues. This includes settings related to audio modes, volume leveling, and HDMI audio formats.
- Streaming Service Variations: Different streaming services may use varying compression methods and codecs to deliver content. If the Roku device or TV does not fully support these formats, it can result in audio lag.
- Software Updates: Outdated firmware or software on the Roku device can lead to compatibility issues with streaming content, affecting the synchronization between audio and video.
- User Settings: Changes made to audio or display settings by the user, intentionally or accidentally, can disrupt synchronization. This includes settings related to audio delay, subtitle timing, and audio output configurations.
- Hardware Limitations: Older Roku models or devices with hardware limitations might need help processing and syncing audio and video data efficiently, leading to delays.
- Network Latency: Poor network connectivity can cause buffering and delay content delivery, resulting in sync issues between audio and video components.
- External Audio Devices: Connecting external audio devices, such as soundbars or Bluetooth speakers, can introduce additional complexities in audio synchronization, especially if these devices have audio processing delays.
- Software Glitches: Temporary software glitches within the Roku device’s operating system or specific apps can disrupt synchronization temporarily.
- Interference: Electronic interference from other nearby devices or equipment can impact the smooth transmission of audio and video signals.
Addressing Roku Audio Out of Sync issues involves identifying and rectifying these factors through troubleshooting steps, setting adjustments, and, in some cases, hardware maintenance or replacements.
Quick and Simple Methods to Fix Roku Closed Captions Out of Sync Issue
Below, I’ve outlined a set of quick and effective methods to resolve the frustrating issue of Roku closed captions out of sync.
If you’ve ever been immersed in your favorite show only to be distracted by mismatched subtitles, these straightforward solutions can bring your streaming experience back on track.
Clearing Roku TV Cache
Sometimes, the mismatch between audio and subtitles can occur due to various factors. One common and effective solution is to clear your Roku TV’s cache.
This can help refresh the system and resolve the subtitle syncing problem. Let’s see the steps to clear the Roku TV cache and get your subtitles back on track.
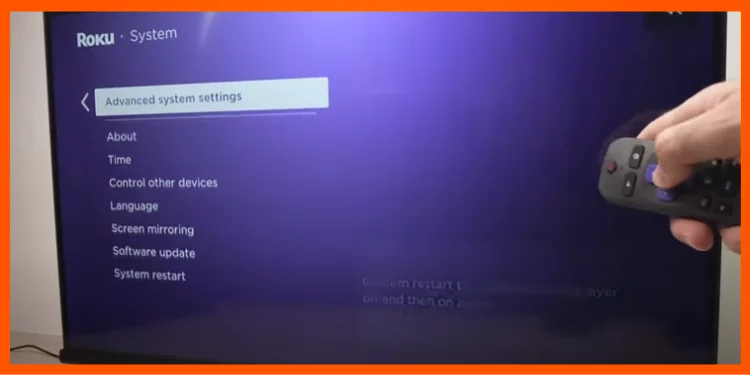
- Access Advanced System Settings: Start by grabbing your Roku remote and navigating to the home screen. From there, select the “Settings” option.
- Proceed to System: Watch for the “System” category as you scroll through the menu. Click on it to proceed.
- Enter Advanced System Settings: Within the “System” section, locate and select “Advanced system settings.”
- Clear Cache: This is where the magic happens. Choose the “Clear cache” option within the advanced settings. Confirm your choice when prompted.
- Initiate Roku TV Restart: Following the cache clearance, give your Roku TV a fresh start by selecting the “Restart” option.
- Check Subtitles: Once the TV reboots, engage with your favorite content featuring subtitles. Observe whether the subtitle sync issue has been successfully resolved.
Clearing the cache can often be a quick troubleshooter, smoothing out performance wrinkles, including subtitle synchronization hiccups. This uncomplicated technique can bring harmony to your streaming, ensuring an enjoyable binge-watching experience.
Power Cycling Your Roku TV for a Fresh Start
Audio desync or subtitle discrepancies on your Roku TV, a simple and effective solution, are often found in power cycling. This method involves giving your TV a fresh start and rectifying various glitches that might be causing issues.
Power cycling might resolve issues like audio lag, closed captioning misalignment, or any other streaming bug.
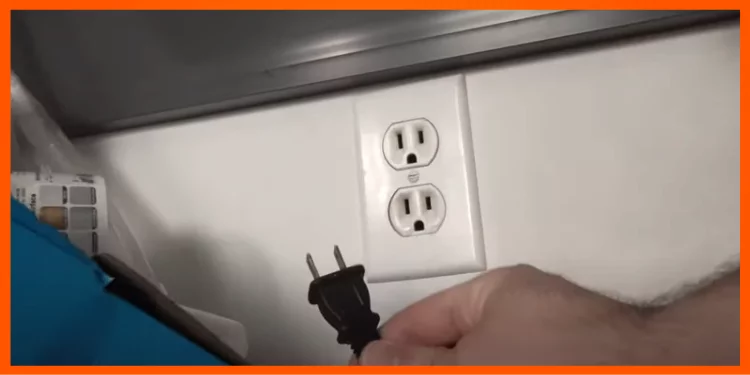
- Preparation: Before you begin, ensure your Roku TV is powered on and running.
- Disconnect HDMI and Power Cables: Safely unplug the power cable from the back of your Roku TV. Disconnect HDMI cables from streaming sticks and game consoles.
- Wait a Few Seconds: Allow the disconnected TV to idle for 10-15 seconds. This brief pause helps discharge residual energy and reset the internal components.
- Reconnect and Power On: Plug the power cable back into the Roku TV. Make sure it’s securely connected. Now, please turn on your Roku TV using the remote or the power button on the TV itself.
- Navigate to Your Content: Once your Roku TV has rebooted, navigate to your favorite streaming channels, movies, or TV shows and select your preferred content.
- Check for Improvements: As you engage with your chosen content, keep an attentive eye on any previous issues you were encountering, such as audio lag, closed captioning misalignment, or other bugs. Observe whether these issues have been resolved after the power cycle.
By following these steps and power cycling your Roku TV, you can resolve audio and subtitle synchronization problems and other streaming bugs.
Switching Audio Mode to Stereo
By following these steps and switching your audio mode to stereo, you can address audio sync issues and enhance the overall sound quality of your Roku streaming experience.
- Access Audio Settings: Start by navigating to your Roku’s main menu using your remote or device interface.
- Navigate to Sound Settings: In the main menu, locate the “Settings” option and press the “OK” or “Select” button on your Roku remote to access the settings menu.
- Enter Audio Settings: Scroll through the menu to find “Audio” settings. Please highlight and select it to access audio-related options.
- Switch to Stereo Mode: Within the audio settings, look for the option to switch the audio mode. This may be “Audio Mode” or “Audio Output.” Select “Stereo.”
- Adjust HDMI Settings (Optional): If you’re using an external audio device such as a soundbar or Bluetooth speaker, you may need to adjust the audio mode for your HDMI connection. Choose “Stereo PCM” from the “HDMI” section of the audio menu.
- Confirm and Apply Changes: After making these adjustments, navigate to the option to confirm your changes. Your device may require “OK” or “Select.”
- Test Your Audio: To ensure that the changes have taken effect, play a movie, show, or content that you were previously experiencing audio issues with. Listen for any improvements in audio quality and synchronization.
Resetting Audio Settings

Following these steps and resetting your audio settings gives your Roku device a fresh start regarding audio performance. This method is helpful if you’ve made many audio settings changes and need to revert.
- Access Roku Settings: Begin by using your Roku remote or device interface to access the main menu of your Roku device.
- Navigate to System Settings: Within the main menu, locate and select the “Settings” option to access the settings menu.
- Enter Advanced System Settings: Scroll through the settings options until you find “Advanced System Settings.” Choose this option to access advanced configuration options.
- Select Factory Reset: Look for the “Factory Reset” option among the advanced settings. This is the setting you need to reset your audio settings.
- Reset TV Audio Settings: You can choose “Reset TV audio/picture settings within the factory reset options.” Highlight and select this option to proceed with resetting your audio settings.
- Confirm Reset: Roku will prompt you to confirm resetting your audio settings. This is your last chance to back out if you’re uncertain. If you’re sure about the reset, go ahead and confirm.
- Restart and Reconfigure: After confirming, your Roku device will initiate the reset process. It will restart, and when it returns online, your audio settings will have been reset to their default values. You’ll need to reconfigure your audio preferences according to your preferences.
- Test Audio Quality: Test your audio by playing a movie or show after reconfiguring. Pay attention to the sound quality and synchronization to ensure the reset resolves any previous issues.
Checking for Software Update
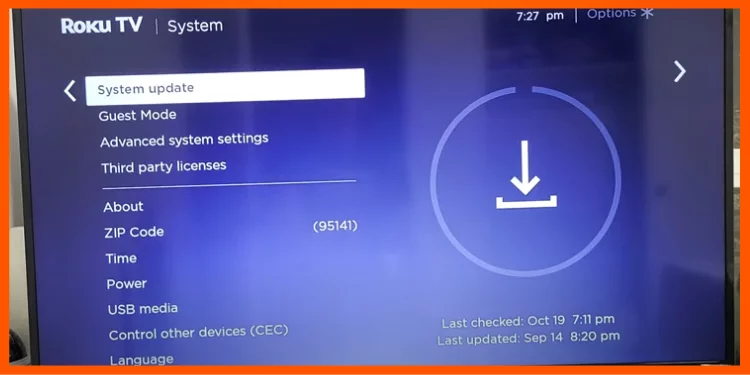
Software updates are pivotal in maintaining the performance and functionality of your Roku streaming stick, Roku TV, or other Roku devices.
A simple but effective method is to check for software updates. New features, bug fixes, and optimizations might improve your streaming experience when you upgrade your Roku software.
- Access Roku Settings: Start by using your Roku remote or navigating through your device’s interface to access the main menu of your Roku device.
- Navigate to System Settings: Within the main menu, locate and select the “Settings” option to access the settings menu.
- Select System Update: Scroll down to find the “System” option in the settings menu. Select it to reveal sub-options, among which you’ll find “System Update.”
- Check for Update: Upon selecting “System Update,” Roku will automatically check for the latest version available for your device. It indicates if the software is updated or needs updating.
- Initiate Update (if available): Roku will allow you to initiate the update process if a software update is available. Confirm and allow your Roku device to download and install the latest software version.
- Restart and Recheck: After installing the update, your Roku device will restart to apply the changes. Go to “System Update” to check your software after it’s online.
- Enjoy Enhanced Performance: With the latest software version installed, you can enjoy an improved and optimized streaming experience. Any bugs or glitches that were affecting your audio or subtitle synchronization may have been addressed in the update.
Ensuring Strong Connections: Network and HDMI Checks
Enjoying your favorite shows on streaming platforms like Apple TV, Android TV, Fire TV, or live TV streaming, a seamless viewing experience is what you deserve. To troubleshoot disruptions, it’s wise to examine your network and hardware connections comprehensively.
This step is especially crucial if you’ve faced audio or subtitle synchronization problems, buffering, or streaming interruptions. You can uncover potential issues hindering your entertainment enjoyment by checking your network and HDMI connections.
- Access Network Settings: Begin by using your remote control to navigate to the main menu of your streaming device, whether it’s an Apple TV, Android TV, or Fire TV.
- Navigate to Network: Find and select the “Network” option in the main menu. You can manage and alter network settings in this submenu.
- Check Network Status: Once in the network settings, you can review the status of your network connection. If it’s showing as connected, proceed to check the signal strength. Ensure it’s labeled as “Excellent” or “Good” for optimal performance.
- Inspect HDMI Connections: While exploring connections, remember to assess your HDMI connection. Ensure the cable is securely plugged into the appropriate port on your TV and your streaming device.
- Check for Dust or Debris: Occasionally, dust or debris can accumulate in the HDMI ports, affecting the quality of the connection. Use a gentle puff of air or a soft brush to remove potential obstructions.
- Reboot and Recheck: After solidifying your network and HDMI connections, consider rebooting your streaming device. This can help refresh the system and ensure that all changes take effect.
- Enjoy Smooth Streaming: By verifying and strengthening your connections, you’re taking proactive steps to eliminate disruptions and enjoy your streaming experience without hiccups. Whether watching your favorite shows, exploring new channels, or enjoying live TV, a strong network and HDMI connection contribute to an uninterrupted and enjoyable entertainment journey.
Contacting Roku Support
In pursuing the perfect streaming experience, challenges sometimes arise that require expert assistance.
If you’ve explored various troubleshooting steps, adjusted audio levelling with clear browsing data, and tinkered with settings like volume mode and accessibility options. Yet, if you face the same issue of audio desync, subtitles out of sync, or other disruptions, don’t worry.
Roku offers a support lifeline to help you navigate these complexities and get back to enjoying your content seamlessly.
- Access Support Options: To reach Roku’s dedicated support team, navigate to the menu button on your Roku remote control. Explore the main menu to find the support or help section from there.
- Choose Your Communication Method: Roku provides multiple channels for you to seek assistance. You can reach out through live chat, email, or even phone. Select the method that suits you best and initiate contact.
FAQs
Why are my subtitles out of sync on Roku?
Subtitles may go out of sync due to settings issues, but toggling the accessibility tap and ensuring subtitles are enabled can often fix it.
What should I do if my subtitles aren’t aligning?
Check the home button restart, internet connection, and channel options. Verify if subtitles are correctly loaded and fixed for the content.
Can I resolve sudden subtitle issues on Roku?
Consider clearing browsing data or updating the channel for better subtitle performance.
How do we address closed captioning problems?
Ensure captions are supported, try enabling accessibility options, and clear subtitle log for a quick fix.
Why do subtitles vary between Roku channels?
Subtitle behavior can differ; validate channel settings and language options for better alignment.
Conclusion
Resolving Roku subtitles out-of-sync issue is a manageable task with these practical methods. By addressing settings, connectivity, and device-related factors, you can ensure a smooth viewing experience. So, Are your Roku subtitles in sync now?