2nd Monitor Detected But Not Displaying Issue [Fixed 2025]
Dealing with the “2nd Monitor Detected But Not Displaying Issue” can perplex many computer users. The excitement of expanding your digital workspace is quickly dampened when the newly connected monitor remains stubbornly blank. No worries! This article explores this issue’s reasons and gives a step-by-step method to fix it. Let’s explore the mysterious second monitor display.
How to Fix 2nd Monitor Detected But Not Displaying Issue
Quick Steps:
- Check the display settings on your computer and verify that the second monitor is detected.
- Ensure the monitor cable is securely connected to the computer and the second monitor.
- Verify the monitor’s and your computer’s compatibility, including the supported resolutions and input types.
- Update the latest graphics driver from the manufacturer’s website.
- Adjust the display adapter properties, such as refresh rate and display mode.
- Test the second monitor on a different computer to avoid hardware issues.
- Check for any firmware updates for the monitor or the graphics card.
- Perform a system restore to a previous stable configuration if all else fails.
- Consult technical support or seek professional assistance if the issue persists.
Second Monitor Detected But Not Displaying
Our detailed guide on troubleshooting the “Second Monitor Detected But Not Displaying” issue provides step-by-step instructions to resolve this frustrating problem and get your monitor working again.
From checking connections to updating drivers, we cover all the essential steps to help you troubleshoot and fix the issue effectively.
Checking and Adjusting Display Settings
Configuring multiple monitors correctly is essential. Dual monitor’s display settings are vital in achieving an optimal setup.
However, there are instances where the second monitor is detected but not displaying anything, causing frustration. This issue often occurs with an external monitor connected to the computer. To troubleshoot:
- Check the monitor and graphics card connection and ensure the cables are securely plugged in.
- Consider an alternative configuration, such as switching the primary monitor or adjusting the display orientation.
- Ensure the monitor is recognized in the system settings and the correct monitor connection is selected.
By carefully examining these factors, you can overcome the hurdle of a detected but not displaying the second monitor, opening up a world of possibilities for a more productive and immersive computing experience.
Accessing the Display Settings
To begin troubleshooting the “2nd Monitor Detected But Not Displaying Issue,” start by accessing the display settings on your computer. Select “Display Settings.” after right-clicking the desktop, and Display settings can be changed here.
Verifying the Monitor Detection
In the display settings window, ensure your computer detects the second monitor. Select the “Detect” button. This will prompt your system to search for connected monitors and display them in the settings window.
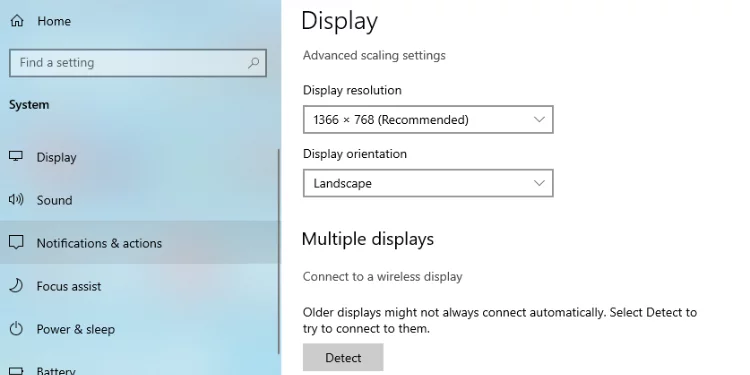
Adjusting Display Orientation and Resolution
Once the second monitor is detected, check the display orientation and resolution settings. Ensure that the direction is set correctly (landscape or portrait) and that the resolution matches the capabilities of your monitor. Adjust these settings as needed and click “Apply” to see if the second monitor starts displaying.
Verifying Connections and Compatibility
When setting up multiple monitors, verifying the connections and ensuring compatibility for a seamless experience is crucial.
Carefully connect the cables to the corresponding monitor ports, providing a secure fit. Check that the system detects the second display and appears in the list of connected monitors.
Consider other monitors and peripheral devices like docking stations or graphics adapters, if applicable.
By confirming multiple ports, using the correct monitor cable, and considering compatibility with secondary screens and peripheral devices, you can create a dynamic dual monitor setup that enhances productivity and expands your digital workspace.
Examining Cable Connections
Verify the computer’s and the second monitor’s cable connections and select the appropriate monitor cable. Ensure that additional cables, such as DisplayPort or DVI, are correctly connected.
Ensuring Compatibility Between Monitor and Computer
Verify that your monitor and computer are compatible. Examine the monitor’s specifications and compare them to the capabilities of your computer.
Checking Display Adapter Properties
Expand the “Display Adapters” category to observe your system’s installed graphics adapters. Right-click on the second monitor’s display adapter and select “Properties.” Check for any errors or conflicts, and if necessary, update the driver.
Updating Graphics Drivers
For optimum performance and compatibility of your graphics hardware and devices, you should update your graphics drivers.
To guarantee optimal system performance, navigate to the driver tab in your system’s configuration and check for updates. You must maintain the most recent NVIDIA graphics drivers if you have an NVIDIA graphics card.
An outdated graphics driver can cause compatibility issues and hinder the performance of your graphics hardware.
You can maximize your system’s potential, improve its stability, and unlock the full capabilities of your graphics cards by routinely updating your graphics drivers.
Identifying the Graphics Card
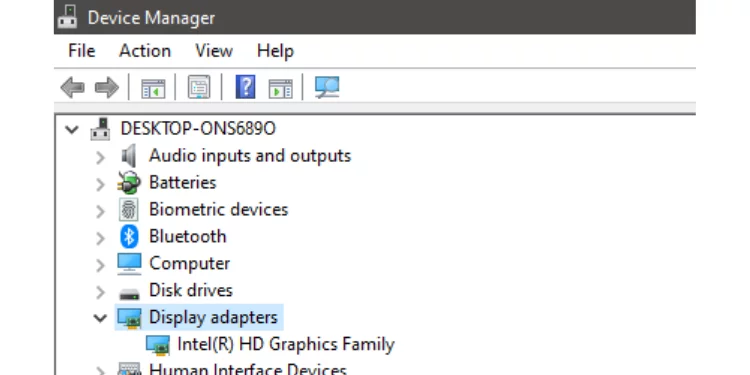
Identify the installed graphics device before updating the graphics driver. Launch Device Manager and expand the “Display Adapters” category to locate the name and model of the graphics card.
Update Graphics Driver Through Device Manager
In Device Manager, right-click the graphics card and select “Update Driver.” Select the option to seek updated driver software automatically.
Downloading and Installing the Latest Graphics Drivers
You can download and install the latest drivers for your graphics card from the manufacturer’s website’s support page.
Configuring Dual Monitor Display Settings
It is essential to configure dual monitor display settings to maximize the potential of your configuration.
Open the settings program to easily access and modify the dual monitor’s display settings. Designate the primary monitor, which functions as the system’s primary display, and ensure the secondary monitor is detected correctly.
Utilize the available options to customize both monitors‘ arrangement, orientation, and resolution, enabling a fluid and productive workflow.
Using the settings application to configure your dual monitors, you can maximize productivity, expand your digital workstation, and improve your overall computing experience with the versatility and convenience of a second screen.
Accessing Dual Monitor Settings
Navigate to the “Multiple Displays” section in the display preferences window. Here, you can configure how the dual displays operate.
Extending or Duplicating Displays
Choose between extending the displays (which expands your workspace) or duplicating the displays (which display the same content on both monitors). Choose the desired option and implement the modifications.
Adjusting Screen Position and Alignment
Adjust the screen position and alignment within the display settings if the second monitor is still not displaying accurately. In the settings window, you can drag and drop the monitors to reflect their physical arrangement and ensure a seamless transition between them.
Troubleshooting Hardware Issues
Troubleshooting computer monitor hardware issues, such as a non-functioning second display or PC failure, is essential. You can overcome obstacles and ensure a seamless and reliable display experience by addressing hardware issues with your computer monitors.
Testing the Second Monitor on a Different Computer
If the monitor functions appropriately on another system, the problem is likely related to the settings or hardware of your computer.
Checking Monitor Settings and Controls
Utilize the monitor’s physical controls to access its settings interface. After selecting an input source like HDMI or DisplayPort, make necessary adjustments like brightness, contrast, or input priority.
Inspecting Monitor Cables and Ports
Inspect the cables and ports of the monitor for signs of damage or loose connections. If necessary, replace the cable or attempt a different port on your computer. Remove any dust or debris from the terminals and connectors that may interfere with the connection.
Performing System Restore
Restoring the system can be a lifesaver when dealing with persistent problems and PC malfunctions. You can quickly restore your computer to a version installed on it in the past by using a pop-up window.
This is sometimes referred to as a restore point. This potent tool allows you to turn back your system, effectively reversing any changes that may have contributed to the problems you’re experiencing.
Creating a Restore Point
It is essential to create a restore point before initiating a system restore. To open the Run dialog box, press Windows key + R, input “rstrui,” and press Enter.
The System Restore window will open. Follow the on-screen instructions to create a restore point on your computer, which will enable you to return it to a previous condition if necessary.
Rolling Back to a Previously Stable Configuration
In the window for System Restore, select “Choose a different restore point” and click “Next.” Displays a list of the available restoration points in the system.
Select a restore point created before the “2nd Monitor Detected But Not Displaying Issue” and then select “Next” to continue. Confirm the restoration procedure, then restart the computer.
Verifying the Second Monitor Display
After the system restores is complete and the computer has resumed, verify that the second monitor is displaying correctly. If not, consider alternative troubleshooting strategies.
Updating Operating System and System Files
It is necessary to do regular updates of both your operating system and your system files to keep your system running smoothly and effectively.
Start by initiating a system scan to identify any potential problems or errors that may be causing your PC fails. This scan will help you identify and effectively address any underlying issues.
Checking for Windows Updates
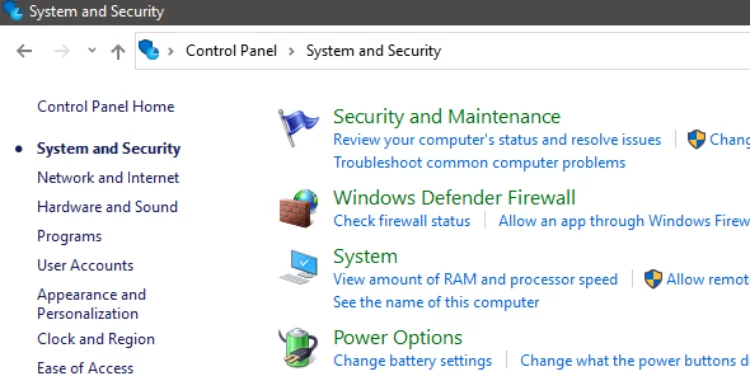
To access the Settings application, press the Windows key plus I. Open the Control Panel and go to the “Update & Security” area to update Windows.
When you get there, click “Windows Update.” The operating system will check for updates if you click the “Check for updates” button in Windows.
Installing the Latest Updates
Click the “Install” button to obtain and install any available updates. Maintaining a current operating system is essential, as updates frequently include bug fixes and compatibility enhancements that rectify display-related issues.
Scanning System Files for Errors or Corruption
To open the Command Prompt in administrative mode, right-click the Start icon, and then pick “Command Prompt (Admin)” from the context menu. Enter “sfc /scannow” after pressing Enter. This will initiate a scan of system files for errors and corruption.
Exploring Manufacturer Control Panel Options
When researching manufacturer control panel options, you have access to numerous potent instruments. Accessing the control interface enables you to optimize the display experience by adjusting settings.
From changing the screen refresh rate to fine-tuning the display driver, these settings will allow you to accomplish the highest quality visuals possible.
Whether setting up a secondary screen, configuring two monitors, or connecting a new monitor, the control panel allows you to customize your configuration.
In addition, if you encounter problems such as a secondary monitor not being detected or computer viruses, the control panel can be helpful for troubleshooting.
By pressing the Windows logo and navigating to the monitor pane in the system properties, you can launch the settings application and gain access to a vast array of options.
Accessing the Graphics Card Manufacturer’s Control Panel
The manufacturer of your graphics device may provide a control panel. Access it by right-clicking the desktop and selecting your graphics card’s control panel option. This could be Intel Graphics Control Panel, NVIDIA Control Panel, or AMD Radeon Software.
Configuring Display Options and Settings
Examine the manufacturer’s control panel for available display configuration options. Examine any settings that may affect the detection or display of the second monitor. Please make the necessary modifications and implement them.
Troubleshooting Specific Manufacturer-related Issues
Refer to the manufacturer’s official documentation or support resources if you encounter problems or error messages with the control panel. They may have troubleshooting guides or forums where you can discover solutions or ask for additional support.
Seeking Professional Assistance
When confronted with complex computer issues, such as a computer virus or difficulties with second display detection, it is essential to seek professional assistance.
After conducting a comprehensive scan of your computer to identify potential threats and, if necessary, performing a system restore, selecting the Windows key can aid in resolving issues with the PC screen or first monitor.
Consulting with Technical Support
You should contact technical support if you have exhausted all troubleshooting steps and the second monitor is still not displaying. Contact your computer’s manufacturer, graphics device, or monitor for assistance.
Reaching out to the Manufacturer’s Support
Visit the website of the component’s manufacturer (computer, graphics card, or monitor) for support. Consider support options such as live chat, email, and phone. Please describe the issue and adhere to their troubleshooting or potential solutions recommendations.
Considering Professional Repair Services
You may need to consult a professional repair service if all else fails. They can more thoroughly diagnose the problem and provide expert assistance. Prepare to share all the steps you’ve taken to troubleshoot the issue, as this will aid their evaluation.
Following this detailed, step-by-step guide, you should be able to resolve the “2nd Monitor Detected but Not Displaying Issue.” Remember to approach each troubleshooting phase methodically, and don’t be afraid to seek professional assistance when necessary.
You will be able to resolve the problem and experience the benefits of a fully functional dual-monitor setup with persistence and the appropriate troubleshooting techniques.
FAQs
Can a faulty HDMI cable cause the issue?
Answer: A faulty HDMI cable could cause the second monitor not to display correctly. Verify that the HDMI cable is securely attached, and consider using a different cable to rule out cable-related issues.
How can I open the settings app to access the display settings?
Answer: To launch the settings application, press the Windows key on your keyboard, select the Start menu, and then select the gear-shaped settings icon. This will launch the settings app to configure your monitor’s display settings.
Why is my second monitor detected but showing “no signal”?
Answer: Typically, the “no signal” message signifies a problem with the connection between the computer and the second monitor. Check the cable connections, ensure the correct input source is selected on the monitor, and ensure the graphics driver and display parameters are correctly configured.
What should I do if Display 2 is inactive despite being detected in Windows 11?
Answer:
- If Display 2 is inactive in Windows 11, select it in the display settings.
- Open the settings app, go to the System > Display section, and ensure the second monitor is enabled and set as an extended display.
- If it’s still inactive, try updating the graphics drivers and verifying the monitor’s and your computer’s compatibility.
Conclusion
When encountering the issue of a second monitor not displaying, a systematic approach is required. Scan computer for any potential problems, restore the system to a stable state if necessary, and then select the Windows key to access the settings app, where you can make the required adjustments and fix the issue by following these methods.